Thursday, 10 August 2017

Rose Garden LOTV

Hi everyone, hope you're all feeling in tiptop condition and enjoying your day.

Today I have a card to share that I've recently made for a friends birthday which is coming up in September.  We are in the process of moving house (still) and I really need to get on top of upcoming birthday cards.

The image is a sweet little one from Lili of the Valley stamps called Rose Garden.  I've coloured her up with distress ink and I decided to do a little paper piecing on her dress and hat as I made a complete mess of the colouring.  I've used various dies, and the flowers are from Wild Orchid Crafts and also some I've made myself.

The paper and card are all from my stash.

Hope you like it.

Tuesday, 1 August 2017

Thinking of You

Hi all

Some time ago, a friend asked me to make her a card for a friend of hers who was diagnosed with an inoperable brain tumour. She had looked and searched in the shops for a card to send to her, but couldn't find a card with a sentiment which seemed to fit.

This is the first time I had coloured up my 'Thinking of You' stamp with distress inks, and absolutely loved it, albeit a bitter sweet reason to use it. I teamed the whole card with various dies and flowers from Wild Orchid Crafts. When I handed her the card, my friend was over the moon. She said the sentiment was just perfect, and the fact that the card had beautiful flowers on it which would be with her until the end, just completed it beautifully.
 Here's a close up of the coloured stamp 💖
That's all for today, hope you enjoy the rest of the week, whatever you have planned

Thursday, 24 September 2015

Happy Birthday Freya and a bit of upcycling

Hi there, gosh, two posts in a week, I'm on a roll lol.

First I'd like to share a card I made yesterday with an older Tilda stamp, so old I'm not actually sure what she's called, my bad.  I've coloured her with distress inks and added a little bit of frantage around her and stardust stickles on her pinny and the flower.  The sentiment was computer generated.
The card is for a friend of my daughter.  She's called Freya but everyone calls her Frezpot, so a nice bit of personalisation for her.  I know she loves blue so I made sure that was the more prominent colour.  Everything is from my stash which I'm desperately trying to use up so I can buy myself some more bits and bobs.  I followed a sketch from mojo monday which helped me along with my layout.

The next couple of pics show a project I've just finished today.  Waste not want not as they say, so I decorated an old plastic iPhone case with bits from my stash.  I intend to fill it with some homemade crunchie fudge and give it to Freya for her birthday.


Hope you like my little shares today, thank you for visiting my little blog


Monday, 21 September 2015

Well hello again.........

Wow, almost 2 years since I blogged.  I've still been around admiring everyone's creations but I lost interest in card making and therefore neglected my lil blog.

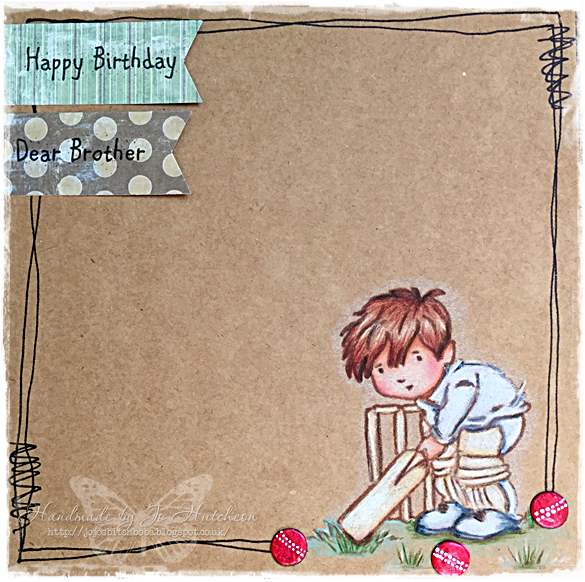
Anyhow, it was my brothers birthday yesterday and I felt like having a play with a LOTV stamp called Cricket.  I'm ashamed to say this little stamp had never seen a colouring medium of any kind, so I dug out my prisma pencils, stamped him onto kraft cardstock and here he is.
It will probably take some time to get back into a blogging routine, especially since I've pretty much forgotton how to do any of it, but fingers crossed this is the beginning of a beautiful friendship lol.

Short and sweet I know, but that's how I'll have to roll until I'm back into the swing of things. Thanks so much for visiting with me today


Thursday, 21 November 2013

White Rose Garden

Hi all, hope this post finds you well.

Todays card that I'd like to share with you was made for The Ribbon Girls current colour challenge of 'White'.  Cool, I thought, don't have to think about what colour paper to use etc etc, but OMGoodness, this has to be one of the hardest cards I've ever made...... and I've learnt something - I had absolutely NO IDEA how many different shades of white there are.  I always thought white was just, well white - ooooh no, not where my paper stash is concerned, lol.
So anyway, I decided that layers and depth were needed here to counteract the fact that there ain't a lot of colour, sooo, I've added a bit of white corrugated card from stash, a cheery lynn doily, tim holtz clock, marianne swirl, christmas lace doohickey, shed loads of marianne rolled flowers covered with snowtex and twinklets,  and some 3D stars made using a xcut die.  The pale grey spotty DP is from Craft Creations.  I also added a coupla scrolls made with Kraft and tied together with some twine. The image is LOTV's Rose Garden.  I picked this image as the card is for an upcoming birthday in December, and I steered away from Christmas embellishments as I didn't want it to look like another Christmas card (epic fail me thinks lol), but I did add the snowtex coz it's bound to be frosty on your birthday if you were born in December lol.

Rose Garden has been coloured with DI's.

Well that's it from me today, loads to do and kids to get to school.

Have a great day, and wrap up if you're going out coz it's gonna be a chilly 'un.

Sunday, 17 November 2013

Just to say Thank You

Good morning lovely bloggers, how are you all this morning?

Now then, a little something to share with you all.  From when I was just a little nipper, I was brought up to appreciate everything, and to say thank you when someone has shown me kindness, so I've always got a pack of thank you cards or paper in my house ready to write and send.  Sometimes, however, when I have been reduced to a blubbering wreck because of a great kindness, I like to send an extra special thank you card which speaks for itself and doesn't need many words, so this brings me onto todays card.
I've made this card for my great Auntie, who, no matter what, is always there to lend an ear, and is ALWAYS able to offer the most amazing advice.

Drip Drop Tilda is one of my favourite Tilda's - drops of rain have already started to fall but her tilted head and expression tells me she still can't decide whether to put her brolly up or not, lol. I've coloured her up with DI's, added a LOTV postmark or 2 and also 'sprinkled' a little frantage around her - I love this stuff.

The pinky/peachy flowers are from WOC and I've rolled the green ones myself with a Marianne die.  All flowers have a generous helping of twinklets.  I've added some gorgeous lace behind the image from LLC and used a doohickly lace border die also - this was also used to make the tags.  The butterfly was cut from a quickutz revolution die and I've added a coupla little buttons on it from my stash.

I bought some fluffy socks the other day to make some sock snow people, previously posted, and the ribbon used for the bow was wrapped around the socks - ha, don'tcha just love it when they do that - freebies, yey, lol.

As usual my papers are very old stock from Craft Creations, apart from the gingham paper, which is a digi paper which was downloaded from Bevs Blog here.  All the pearls are from my stash.

I'm entering this card into the following challenges:-

Crafty Little Fairies - TOTP Song Inspired - (drip drip drop little) April Showers from Disneys Bambi

Thank you for visiting my little blog today

Friday, 15 November 2013

Tilda Hiding Gift

Well I gotta tell you that todays card seemed to take an age to finish.  I had an idea in my head how I wanted it to look, but for some reason, it's nothing like I imagined lol, ahh well, never mind - I'm still happy with it - I think.
I made it specifically for the Live & Love Crafts current challenge which is a Christmas Inspiration Collage. Now then, as soon as I saw this piccie I just fell in love with the metalic looking Christmas trees, so decided to make my own to add onto the card - complete with star toppers and all.  I just cut a couple of different size scallop circles in core'dinations cardstock, then cut them right through the middle. I then folded them to form like a little clown hat, glued them, them popped one on top of the other, added a little star, and a generous helping of snowtex, and then voila - little trees, heehee.

I cut the glass looking baubles out of acetate with a spellbinders bauble die, covered them in crackle accents and edged them with snowtex, then added a cuttlebug snowflake and WOC grey rose in the center of each. All the other flowers are also from WOC.  I got the idea for the 3D stars, which are just covering my Whimsy snowflakes, from Create & Craft when I was watching an episode featuring LOTV products.  Dawny made a gorgeous star wreath using just a bog standard star shape but folded them to create the 3D effect.

I made my own version of the sticky out tag from a doohickey border die as I don't have a tag die atm, so I improvised with what I already own.  Think it turned out ok.

Gorgeous Tilda Hiding Gift (my most favourite Tilda stamp of them all) hasbeen coloured with my Prisma Pencils this time and then covered in Stardust Stickles.  No Christmas card is complete without that stuff, lol.

Well, I'm off to do the usual household chores, then a bit of colouring me thinks.  No workie for me today.

Thanks for your visit.

Challenges I'm entering
Live & Love Crafts - Christmas Inspiration Collage
Totally Tilda Challenge - Add a postmark (photo hasn't picked it up very well, but they are there next to the image - I promise

Thursday, 14 November 2013

All Wrapped Up - and ready for the Lovely Lili Challenge

Good morning all, and what a beautiful sunny day it is up here in Cumbria - albeit very very cold, brrrrrr. Had to put my fluffy earmuffs on this morning to walk Brooke to school as that wind was just biting - might just have to invest in a fluffy handmuff like the lovely little lady on my card today lol.

Todays card features All Wrapped Up from LOTV. Again, another older stamp, and the first time I've inked her up - honestly, how could I leave her so long, she's adorable - but at least she eventually made it onto a card.  I've got a stack more that have never seen the light of day, and a cuddy load of new ones that I soooo long for......... watch this space lol.

Anyhow, I've coloured her with distress inks and was hoping the piccie wasn't going to make her look too orange as IRL she is really red.  Really don't like colouring in red with DI's, as the paper I currently have completely changes the DI colours, but I just kept lathering on layers and stopped when I achieved the shade I liked.  I lathered the handmuff in glossy accents then added white fun flock to make it appear even more fluffy.

The DP is from Craft Creations, as is the red card used for the card base, poinsettia and layering.  The snowflakes are cut from an old cuttlebug die and I've lathered them (I seem to do an awful lot of 'lathering' lol), along with the spellbinders floral oval, in crystal glamour dust.  Again, IRL, they are really sparkly, but the photie doesn't show it so well.  The ribbon and pearls were from a friend, who I believe got them from The Ribbon Girl.  I punched some holly shapes and covered them in Holly Stickles and popped them onto the top of the sizzix fence.  The sentiment is also LOTV, the bottom one with names was computer generated.

Well that's it from me for today, happy Thursday to you all - nearly the weekend, yippee.


Challenges I'm entering

Sunday, 10 November 2013

Super Cute Snow People

Y'know when you just happen across something and think, wow, what a great idea, gonna have to try that????  Well, I'm one of those people who always has the best of intentions, but never actually gets around to trying something out - until now.  I saw these most adorable little snow people on a blog and just had to have a go.  They were made by one of the most talented, inspiring and absolutely hilarious bloggers I follow, Suzanne Dean, who posted a very simple step by step tutorial on how to make them which you can find here - and, now, a piccie of my little family of snow people, lol.

I made these in less than an hour with my 8 year old daughter Brooke.  She absolutely loved it - super quick and a brilliant little project to make with the kids with Crimbo just around the corner.  We didn't have a lot of choice with the socks (house full of boys and not many white socks), so we improvised with a pink and cream pair and made four little cuties out of them - and I can tell you now, I am definitely going to make more of these.  They will make fantastic little gifts for Brookes teachers at school.

Well, that's all from me today, thanks for visiting.

Thursday, 7 November 2013

Pink and White - with a splash of silver

At last I've woken up without the sound of pitter patter raindrops on the bedroom window - what a delightful change - the weather up here in Cumbria has been downright dismal.

Anyway, enough jibber jabber about the weather, and onto todays card.  I had a play yesterday with my distress inks and decided less is definitely more on this gorgeous image by LOTV - can't you tell I love those stamps lol. So, here's my card for today
I love the way soooo many people colour these sweet images with just a little dash of colour here and there rather than over the whole image so I thought I'd give it a little try.  I didn't want to overload this card too much especially with the pompom trim around her which I got from LLC, so I kept it the same as the colouring - less is more.  I also added a dottle or two of liquid pearls around her.

The snowflake is a spellbinder die which I lathered in silver glitter, coz it just didn't look right on the card in white, and the Christmas tree is cut out of coredinations cardstock with a Dees Distinctively Die and sanded on the edges - OMWord I gotta tell you I love this tree.  I bought the large one and believe me, it is sooooo versatile.  You can make little dinky trees with the two small sizes at the top of the tree, or cut the whole thing twice and make it the size of a 150cm card.  Spiffing if you ask me.

The sweetheart blossoms and aster daisies were of course from WOC and I rolled the two pink ones myself using a marianne die.  The papers again are very old stock from Craft Creations but you can still get them.  The little fence is an old sizzix die.  The double bow which is hiding the rest of the coloured holly on the image is made from some hemming web I bought to take up my daughters school trousers.  It was totally naff for that particular job and I was going to lob it in the bin but then had a play and realised it makes the most gorgeous shimmery bows - recycling eh, the possibilities are endless rofl.

Anyways, enough blabbering on, coz it's just too early lol. Hope you have a lovely day wherever you are and thank you so much for visiting with me today.

Challenges I'm entering